My work fits into two very different and unrelated categories: realism and abstract. Each style allows me to challenge different parts of my personality. Drawing realistically indulges the side of me that loves detail and is a perfectionist. It challenges me technically and I am always pushing to create more accurate drawings. The abstract works reflect my interest in colour and form. I am able to work loosely and fluidly, reacting to the painting as I go. It is sometimes a relief to shift from the tight discipline of realistic drawing to this type of work, but it can be equally relieving to go from these open-ended paintings to getting lost in the details of a drawing.
A very important part of drawing realistically is shading: the variation in value from shadows to highlights that describe the shape of something. By improving your shading, you can greatly improve the quality of your drawings. Shading isn’t difficult to learn, but it does take some practice. You can learn how to make your drawings more realistic by understanding light, controlling your pencil, and blending.
To learn more about Miranda, please take a moment to visit her websites below:
Pointillism is a technique using a series of dots to create an image. It takes time, and loads of patience, but the results can be incredibly impressive!
For pointillism, you’re going to need some special pens. The best are fine tip pens with free-flowing ink. Ball point pens don’t work well because they need to be moving for the ink to flow. My favourites are Staedtler Pigment Liners. You’ll also want a range of sizes as well, from very fine to a wider tip. Something like a 01, a 03, and a 05 would work well.
Throughout the drawing, you’ll use each size of pen. Make sure you blend the dots together when you switch pen size. You don’t want to see the border where you switched pens. Also, don’t rush your mark-making. If you get careless, some of your points might get little tails. You want nice clean dots to create an even pattern across the whole of your drawing.
As with any drawing, you want to start out with a good line drawing. Outline the contours of your subjects, as well as the shapes of the major shadows and highlights. You want to have good guidelines for when it comes to filling in the values.
When using pointillism to shade, you need to think about values just like you do when shading with a pencil. It’s important to have a range of values to give your drawing enough contrast.
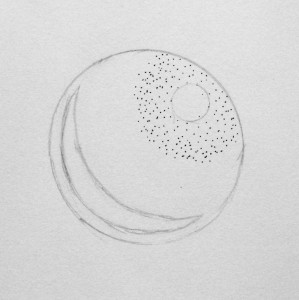
Let’s use the sphere as an example for how to shade with pointillism. Once you learn how to shade basic shapes, you can shade just about anything!
Start with your finest pen and make some dots around the highlight. Avoid putting any dots inside the highlight area, but make sure that the points gradually become more and farther apart closer to the highlight. You don’t want your marks to suddenly stop dead. As you move away from the highlight, place your dots closer together.
As the highlight fades to the mid-tones, switch to the middle-sized pen and mark your points closer together. Now you can fill in almost the entire sphere, making your points closer together as you approach the shadow.
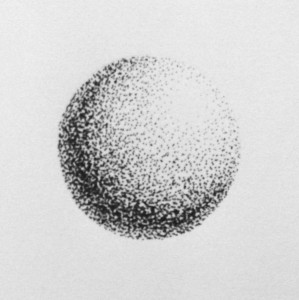
For the shadow, use your widest pen and make your marks close together. In the darkest areas, your dots should be so close together that white shows through. You might be tempted to cheat and use the pen to color in the entire shadow.
Try to resist!
It would be faster, but it would be obvious. With pointillism, it’s important to use only dots. The marks create a pattern or a texture that is visible even in the solid black areas. If you have a really large area of black that would take you days to dot, you could try colouring it in solid, then adding a few dots on top to mimic the pattern. I don’t recommend it, but you could try.
When drawing with pointillism, make sure you don’t draw any lines. Even when you’re drawing wrinkles or eyelashes use a series of points to create the line. It will look more natural than a solid line, which would stand out amongst all those dots
When your drawing is done, let the ink dry for ten minutes or so before erasing the pencil lines. You’d hate to smudge all your hard work!
Pointillism in Colour
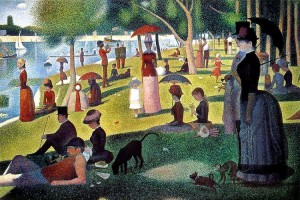
You can also do pointillism in paints or pastels. This technique involves layering different colored dots on top of each other. When seen from far away, it’s like an optical illusion: dots blend together and create a new color. A simple example of this would be dots of red and yellow, which would appear as orange from far away. This type of illusion was used extensively by the French painter, Seurat.
His example from Wikipedia is A Sunday on La Grande Jatte, by Seurat.
Comments
carolesays
Loved this lesson on shading using pointillism.
Adamsays
this is fantastic, I am quite good at drawing it’s really a passion, i always thought i was decent at shading but i never heard of this pointillism, it’s so good i would like to thank you very very much this has brought my work to the next level.
Cyndisays
Thank you so much for contributing this lesson. I really appreciate your willingness to share your experience with those of us who are amatures. It would have been more beneficial to have seen more examples or examples that were zoomed in to better see the details of this type of work.
cynthia smithsays
Thanks for the tips. I’m starting to get back to a God given talent, art. At age 55, it’s never to late ! Web’s like yours help to give people like myself a lot of confidence in our work.My project is two pictures of my daughters dogs ( which will hang over their fireplace mantle. I wanted a realistic look. I’ve applied a light random wash of a very pale sepia over my sketches. Then I’m using a “strippled ” pen & ink , using dark sepia ink. When finished they will be matted and framed in a rustic wood frame.
stevesays
Great post! i loved this lesson,its fantastic,i really appreciate your willingness to share your experience, keep it up!
I am working with men in prison as a psychologist and using art therapy. Some have never drawn before. You ideas and demonstrations will help them. I gave http address to them as well. Some of the persons know how to draw and shade and about half do not. I am having the ones who know how to shade work with persons who do not. At the same time upping the skills of those who have talent. It is amazing how the conversation and openness that develops enhances these groups as well as other group therapy sessions. The enjoyment of the process spreads to the rest of life.
Manasvisays
Thank you for the tips! I am trying to do them in soft pastels… would it be good for a tree? @Cynthia Smith — can u post up your photo once you are finished with it? It sounds really interesting! 🙂
krushitsays
Thanks for the tipspo in pointillism. I like most.
Navamalati Chakrabortysays
Today I tried out a new sketch of mine using the technique of Pointilism. The result was amazing, though I used hatching simultaneously with it. I love experimenting. The sketch is of a crow sitting comfortably on a cushioned chair with a man’s head in the background with his brains exposed. Thanks for sharing your views. I wish we could share ideas thus. Bye.
Peppersays
Seurat is one of my all-time heroes. So are you!! I admire the tenacity of all pointillists.
Thanks alot am from nigeria any tips on crose hatching if any is available i need help, tnx.
Jack R. Mooney Sr.says
I’ve been drawing for a while now but I tried this out and fell in love with it. I did hear about it before but never tried it. I just love what you can do with it. This is my new thing. Great


Loved this lesson on shading using pointillism.
this is fantastic, I am quite good at drawing it’s really a passion, i always thought i was decent at shading but i never heard of this pointillism, it’s so good i would like to thank you very very much this has brought my work to the next level.
Thank you so much for contributing this lesson. I really appreciate your willingness to share your experience with those of us who are amatures. It would have been more beneficial to have seen more examples or examples that were zoomed in to better see the details of this type of work.
Thanks for the tips. I’m starting to get back to a God given talent, art. At age 55, it’s never to late ! Web’s like yours help to give people like myself a lot of confidence in our work.My project is two pictures of my daughters dogs ( which will hang over their fireplace mantle. I wanted a realistic look. I’ve applied a light random wash of a very pale sepia over my sketches. Then I’m using a “strippled ” pen & ink , using dark sepia ink. When finished they will be matted and framed in a rustic wood frame.
Great post! i loved this lesson,its fantastic,i really appreciate your willingness to share your experience, keep it up!
I am working with men in prison as a psychologist and using art therapy. Some have never drawn before. You ideas and demonstrations will help them. I gave http address to them as well.
Some of the persons know how to draw and shade and about half do not. I am having the ones who know how to shade work with persons who do not. At the same time upping the skills of those who have talent. It is amazing how the conversation and openness that develops enhances these groups as well as other group therapy sessions. The enjoyment of the process spreads to the rest of life.
Thank you for the tips! I am trying to do them in soft pastels… would it be good for a tree?
@Cynthia Smith — can u post up your photo once you are finished with it? It sounds really interesting! 🙂
Thanks for the tipspo in pointillism. I like most.
Today I tried out a new sketch of mine using the technique of Pointilism. The result was amazing, though I used hatching simultaneously with it. I love experimenting. The sketch is of a crow sitting comfortably on a cushioned chair with a man’s head in the background with his brains exposed.
Thanks for sharing your views. I wish we could share ideas thus. Bye.
Seurat is one of my all-time heroes. So are you!!
I admire the tenacity of all pointillists.
Hi – thanks for this great tutorial. I used it to inspire a wet felted piece I made over at http://flicstarstudios.com/2012/05/05/pointillism/
Thanks alot am from nigeria any tips on crose hatching if any is available i need help, tnx.
I’ve been drawing for a while now but I tried this out and fell in love with it. I did hear about it before but never tried it. I just love what you can do with it. This is my new thing. Great