How to Draw Realistic Clouds & Skies – Drawing Tutorial
Start by just looking up.
Ever since a fellow artist challenged me to include a sky in one of my drawings, I have been keeping my mind in the clouds. I am continually amazed at the beauty of just looking up in the sky! Over the past couple of years, I have been learning the importance of toning the sky and adding clouds as part of overall compositional improvement in my landscapes. I think I could spend hours and hours fiddling with each puff of white!
Start looking up to the sky and observe cloud formations. Take photos of clouds and you will be amazed at what you will start to “see”!
What’s the purpose of a sky?
Is it important to put a sky in? There isn’t any clouds in the sky so why should I shade it? I use to think this and if you visit my website, you will see many of my earlier works did not include a toned sky. For a long time I didn’t even “see” tone in the sky. It wasn’t until recently that I realized the impact of adding a toned sky to the overall landscape. Here are some of the things a toned sky will do for your drawing:
- Broadens the range of tones available in your drawing. The white of the paper can now represent the highlights only.
- Creates uniformity to your drawing composition
- Adds an additional sense of reality to your landscape.
- Adds atmosphere and sets the ‘mood’ of the scene.
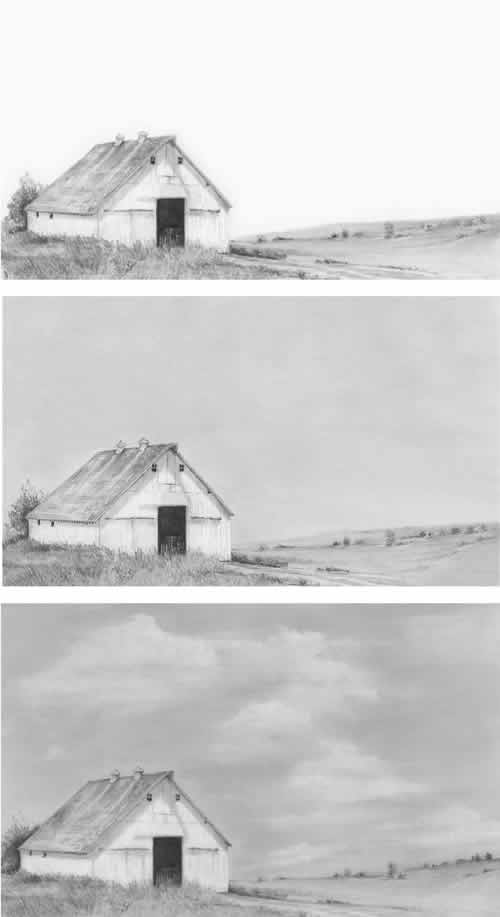
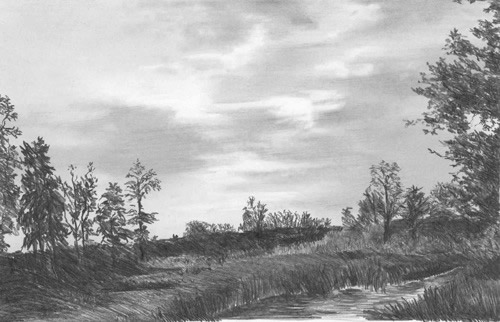
Here is a drawing done to illustrate the importance of a toned sky and why the sky/clouds should be considered in the overall compositional study of any landscape.
In this series of drawings, I have chosen to a very simple scene with a white barn. My only variable in the three drawings is the inclusion of a sky and clouds.
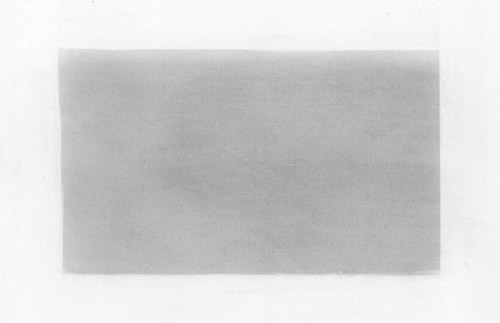
The first image is a drawing without a sky. The drawing is very stark and the sky (the white of the paper) is competing with the white of the barn.
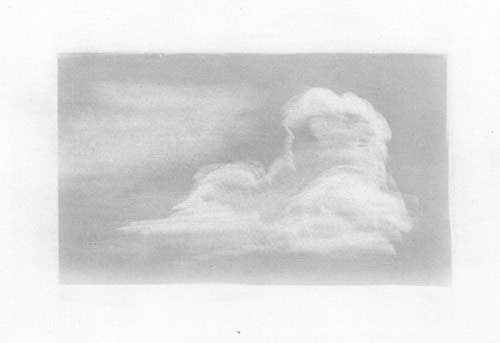
The second image is much better by adding a toned sky. The white barn is now the focal point as the toned sky accentuates and brings the entire scene together much better.
The third image incorporates a toned sky as well as including clouds. The clouds add depth to the scene as the clouds recede into the distance. They also create a visual directional flow for the viewer. The clouds lead the eye through the drawing and add interest as well.
Cloud Formations and Cloud Types
- Stratus – Wispy light clouds
- Cumulus – white puffy…cottony
- Dramatic – rain clouds – thunderheads
- Back lit clouds – sunsets
TIPS:
- Skies are lighter at the horizon and go darker as you go up the sky
- Clouds use perspective – smaller and tighter the farther in the distance they are
- Unless the sky is the central part of the drawing, light wispy or under-stated clouds work well
- Use clouds to lead the viewer through your landscape
- Clouds have form and are 3 dimensional – they just don’t have any lines are hard edges
- The more dramatic clouds – the darker the base tone should be (this allows more range of
tones)
Drawing Materials:
This is a very specific list of the materials that I use. Substitutions can certainly be used. Experimentation and adjustments are expected to customize these techniques to your style of drawing.
- .5 mm Mechanical Pencils F and 2H lead
- Chamois
- Tortillion – small
- Blu-Tack
- White plastic eraser
- Small Ruler or T-square
- Strathmore 300 Series Bristol Board
- Make-up brush
4 Steps – Drawing a Sky with Clouds:
STEP 1 – CROSS-HATCHING
I use a loose-hold hand position when creating the cross-hatching. I find the just weight of the pencil on the paper will create pencil strokes that are light and consistent.
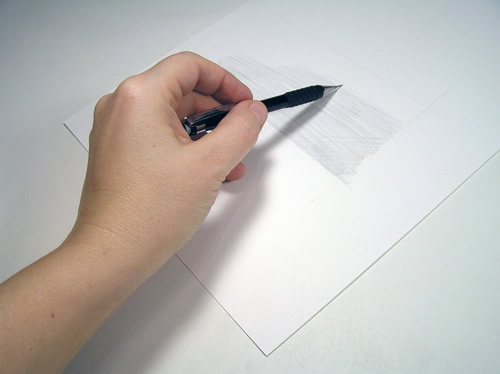
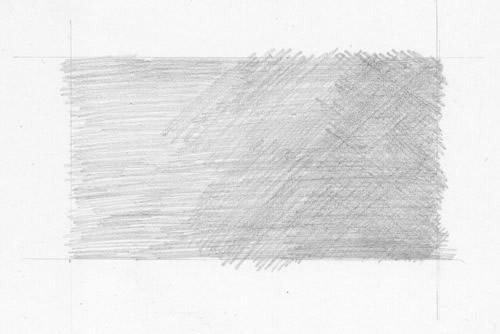
I cross-hatch 3 layers of graphite onto my paper using the F lead. The first layer is placed horizontal on the surface, the next two layers are diagonal.
STEP 2 – BLENDING
Using a chamois wrapped around my index finger, I blend the graphite smooth. Chamois with a firm, and even pressure. It may take several passes with the chamois to create a smooth even tone. Be sure to blend over the edges of the drawing area as well as overlapping the buildings, trees and horizon areas. It is much easier to erase than to add a missed section later.
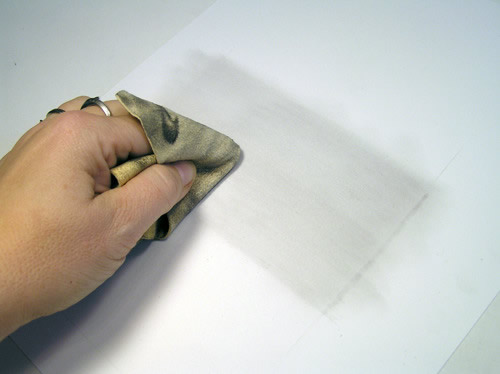
Avoid touching the surface of the paper with your fingers. It is at this point in the blending process that blemishes or finger prints will magically appear. If they appear, it is very difficult to fix (unless they happen to be in a cloud formation) and many times I just have to start over!
I will add 2 more layers of crosshatching with 2H lead and blend with the chamois again. This creates a nice smooth finish. I trim the edges of the drawing using a t-square ruler and a plastic eraser.
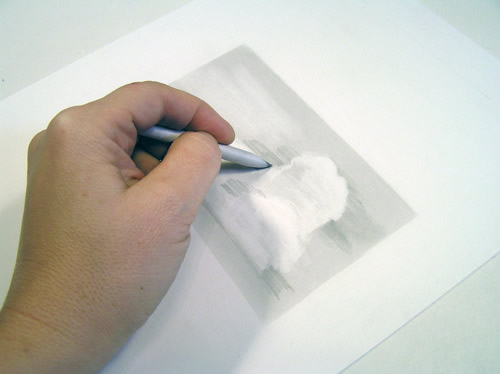
STEP 3 – LIFTING OUT THE CLOUDS
I use a mars plastic eraser with a chisel edge and erase my clouds into the sky. For light wispy clouds I use blu-tak and just drag it across the surface.
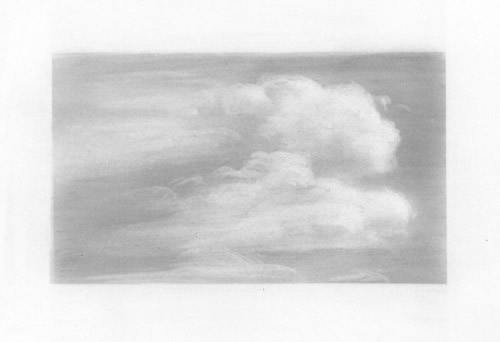
STEP 4 – DETAILING
Use a 2H lead pencil to layer in darker areas next to the whitest tops of the clouds. A tortillion is used to blend in and work in the details. By blending, lifting, erasing and layering in more graphite, the clouds emerge on the paper.
I soften the clouds by using the blu-tack. To make more dramatic clouds darken the background sky. This allows white cottony clouds to be more fully formed. Keep in mind that unless your drawing’s emphasis is the clouds, they should not compete with the rest of the landscape. They should be subtle and gently lead the viewer’s eye through the scene. Typically I use light wisps and hints of clouds in most of my landscapes.
I usually spend 5-8 hours just drawing the sky and cloud areas. PATIENCE is key in creating smooth skies.
Once you the basic technique of creating smooth tones and general cloud formations, the sky is the limit to all the possibilities and variations you can create. Every moment… every hour… every day…every season…the sky changes it’s mood and design, providing us with an unlimited resource of inspiration to our landscapes.
Sunsets & Dusk Images
Here is a quick study (less than an hour) on clouds in the early evening just as the sun is thinking about setting. The clouds are backlit by the sun and are darker than the sky. The trees are mostly in shadow and most of the details are subdued. This is a small drawing only 4.5″ x 7″. The sky is a lighter tone than the clouds and is just a reverse of regular clouds.
About Diane Wright
In 2002, I picked up my art pencil again after 20+ years. During this break, I devoted my time to my family and building a career. Even though I earned my Bachelor of Fine Art degree at the University of Northern Iowa, my career path ventured away from the fine arts. I am currently an IT Manager at a medical auditing firm in Des Moines, IA. My children are in college and it’s now time for me to explore my arts again! I live with my wonderful husband, Les, in the small town of Mitchellville, Iowa.
– Diane Wright
To learn more about Diane and to view her work, please visit her website:
Diane, your clouds are beautiful! I too am fascinated by clouds! As a matter of fact I have an Album on facebook just for Cloud photos. Pennsylvania has some beautiful skies. So I of course, named the Album Pennsylvania Skies.
I am a self-taught, in my spare time, Artist living in Central Pa.
Thanks for the tutorial!
Leona Palski, Antes Fort, Pa.
Hi,well firstly let me thank you for that tutorial, it is something that i was looking for a long time and it is one of the best .humbly yours.Armand.
Thank you for an excellent tutorial
Regards,
Peter
Really interesting & well presented
fantastic it is so easy.
I thought the article on drawing clouds was excellent and very helpful.
This is very interesting as I occasionally do like to take my scrap book out when in need of some inspiration. Your tips are most welcome, thanks.
I like to draw very much. But in drawing I only use rendering by pencil or ballpoint and I don’t touching my drawing with finger or like you did in making clouds. I think the drawing will look more beautiful, more expressive, and more artistic if you pure working with rendering in many way not by touching it with finger. Because what we try to show in drawing is the lines.
Great tutorial, it really helped me a lot. I think this is a truly fascinating way to draw. I was very confused with clouds until just now.
Thanks, ~Kye
Thanks for providing such a detailed way of sketching. I love sketching and love to do when I am with nature.Recently I got to know about the pieces of charcoal which are used by many professional people. But I dont know how to use it. It would be a great help if you could elaborate on as how to use charcoals for sketching. Is it the same as the charcoal pencils ?
wow! this was really helpful… i’ve always wondered how to draw clouds… this article was very helpful and interesting.
This is a great learning lesson while most of my drawings are done using charcoal I have found that these techniques would very well. Thank you for sharing your techniques and giving such detail about them.
.-= Russ Smith´s last blog ..Just added Wild West Mustangs =-.
I think this is a truly fascinating way to draw. I was very confused with clouds until just now. Firstly let me thank you for that tutorial, it is something that i was looking for a long time and it is one of the best .Humbly yours.
I think this is a truly fascinating way to draw. Thank you for sharing your techniques and giving such detail about them.
I think the drawing will look more beautiful, more expressive, and more artistic if you pure working with rendering in many way not by touching it with finger. Thank you.
It would be a great help if you could elaborate on as how to use charcoals for sketching. I think the drawing will look more beautiful. Thank you.
thank you for
good toturial
Nice post! its interesting as I occasionally do like to take my scrap book out when in need of some inspiration.thanks for sharing….
Thanks for the wonderful lesson. I have just started painting and I love skies and clouds. I learned good tips with your lesson.
tank u very much 4 dis amazing site………….it helped me a a lot
Pretty great post. I simply stumbled upon your weblog and wished to mention that I’ve really loved browsing your blog posts. After all I will be subscribing in your feed and I’m hoping you write once more very soon!
Wow very good job with describing how to draw clouds!! It was done very well!! You have a very great talent!! Use it.
Thank you for such detail I am a beginning artist and looking for sites with art tutorials this is great even as a beginner i was able to use these easy but valuable techniques
I miss a beautiful sky. Currently I live in Guangzhou, China and the sky is always kind of white like in your first picture because of the pollution. I didn’t think much before about tones of the sky, but certainly they can show different things. Some hues can convey happiness and warmth, others cold, and others gloom. The sky is God’s painting, but we can make it ours too in some small ways with the techniques you have presented.
Your clouds are truley amazing and I did try to copy with a colouring pencil but I just haven’t got the grasp of it. See I’m used to digital colouring and I would normally just smudge some clouds in my picture but for once I’ve decided to do a dramatic scene, but so far my clouds have let me down. But this has helped thankyou!
your clouds are awesome!!!!!!!!!
Thank you Diane! Very helpful. I have been practicing, buying books and I think your little tutorial have enlightened me most of all!
Thanks.
George
how whould you raw clouds in pen becuase im better at drawing in pen than pencil.
THANK U FOR THE EXCELLENT TUTORIAL
m impressed n learnt alot here
I hope this will be of much help to me. Thank you inadvance
Your work is lovely,and I appreciate your tips but I need to know how to color the sky and clouds using colored pencils preferably prismacolor but I also have all types. I’m having a lot of trouble using colored pencils rather than just regular pencils from which I’ve had good results after watching some videos. if you have the time to tell me I would really appreciate it. I have not seen any videos which cover colored pencils and clouds or grassy meadows. Thank you so much..Marcia
Thank you for making the effort to make such a nice tutorial available for free. You touch the lives of many more than respond here, I’m sure.
Very best regards,
Doreen
Thank you so much for this tutorial. It was perfectly articulated and easy to follow. It makes me excited to try this. Which I haven’t felt In quite a while. It is the best explanation I’ve seen ! Thank you !
Thank yoU very much for the drawing of clouds thIs whas the eases to draw thank yoU very much paul
I appreciate your taking the time to make this. It isn’t the first answer google comes up with, but it is the first one that I can understand and is applicable for what I’m drawing. You’re very talented and I thank you for your efforts.
Woph!..i was given an assignment to draw the cloud ,but i didn’t know what to do.Until i found this page…it realy helped me a lot.
Atuman villa.