Enjoy this awesome tutorial on how to draw the eye by artist Faith Te (see bio and website link below).
How to Draw the Human Eye by Faith Te
Here is the first tutorial from Art Studio — a female eye. My method in graphite pencil drawing aims to render subjects as realistically as I can. The following is a step-by-step demonstration of how I draw eyes. While I very much hope that it helps you in drawing realistic eyes, do experiment and develop your own way of drawing. I myself sometimes do not follow some of the steps exactly as I like to experiment and try to find better ways of achieving a specific texture or effect. Before I begin, many thanks to Toni-Marie Hudson for the use of her picture. Toni-Marie does animal paintings in mixed media. Visit her web site to view her extremely realistic paintings.
Step 1 – How to Draw the Eye
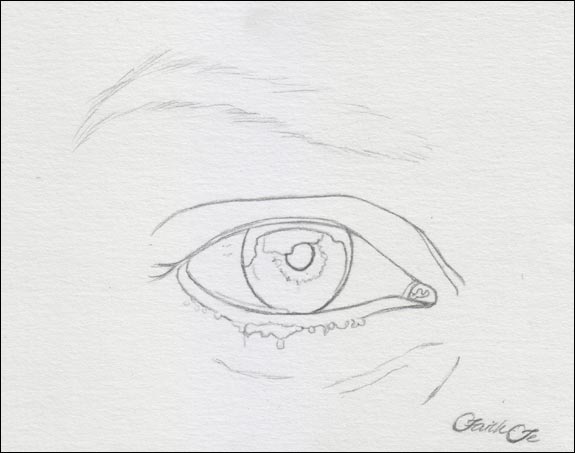
The outline on Canson Grain. Since the outline was very light and will likely be smudged off when I start rendering or shading, I have carefully and lightly retraced the lines with a soft pencil. In this case, a Faber-Castell 0.5 mm 2B mechanical pencil.
Step 2:
Using a soft brush dipped in small amounts of graphite powder, I cover the outline with two or three layers of tone. Any brush can be used as long as it produces a very smooth effect and fills in the tooth of the paper. I try to avoid getting tone on the highlight of the iris. If I do get any graphite there, I tap the area with a clean kneaded eraser.
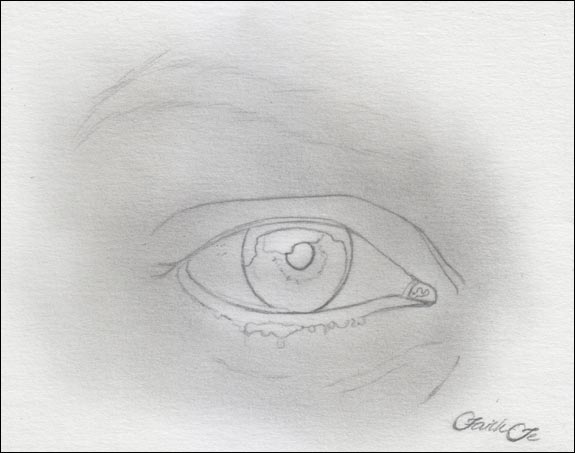
Step 3:
Using a smaller version of the brush I used in the previous step, I begin forming the shapes of the eye by defining the darker areas.
Step 4:
With a kneaded eraser, I cleaned up the highlights.
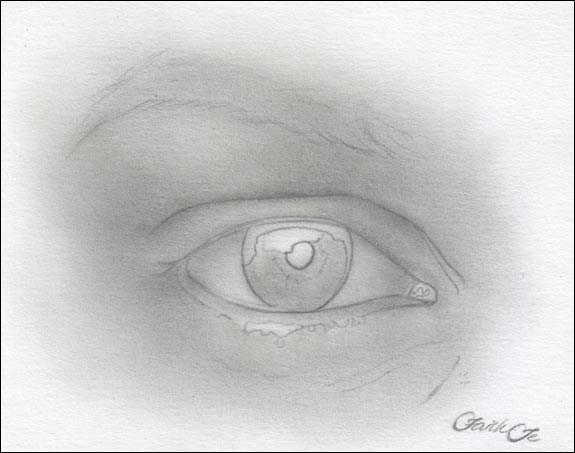
Step 5:
I used a Dong-A 0.5 mm 2B mechanical pencil to draw the darkest areas like the pupil, shadow on the upper part of the iris and the crease of the upper eyelid.
Step 6:
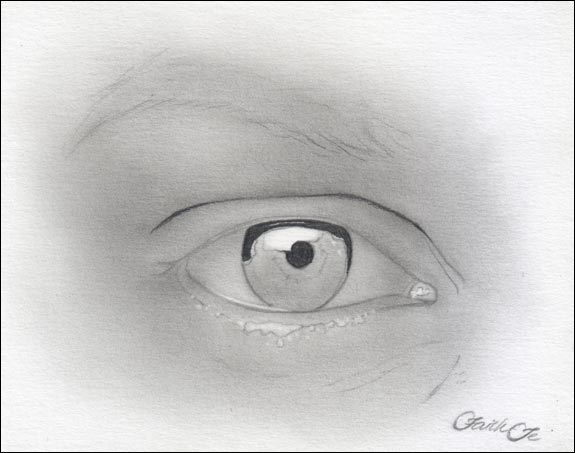
Concentrating on the iris for now, I use a hard pencil (5H Staedtler) and fairly hard pressure to draw spokes originating from the pupil. This will keep the paper from absorbing a lot of graphite in the next stage.
Step 7:
Having used a 5H on the previous stage, I can now draw darker shades on the iris using a dark pencil (2B mechanical pencil). The reason why I use 2B is because it spreads more easily. The 5H is also to keep the tones very smooth when darker tones are added.
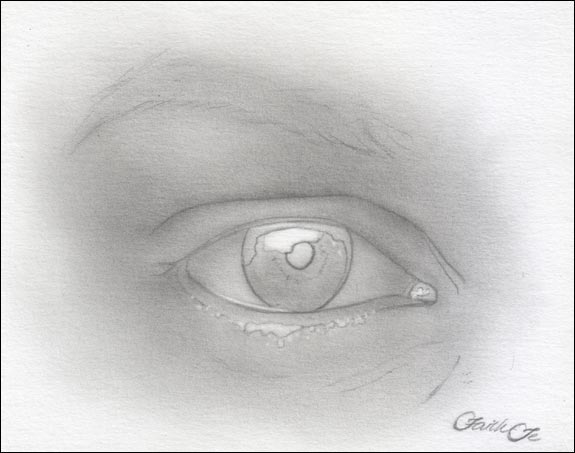
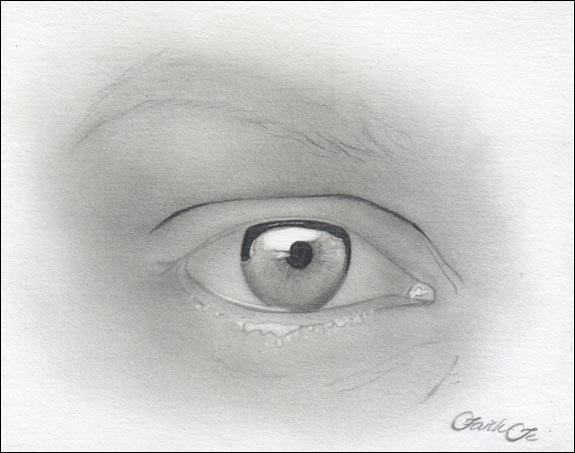
Step 8:
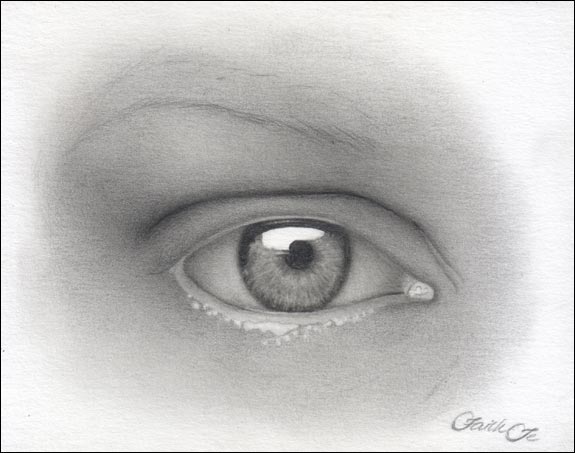
I further worked on the iris erasing and adding graphite as much as needed to create varied tones. Moving on to the white of the eye, it was also covered with a layer of 5H to create a smooth effect. Then I used a 2B mechanical pencil on the shadow areas to form the eyeball.
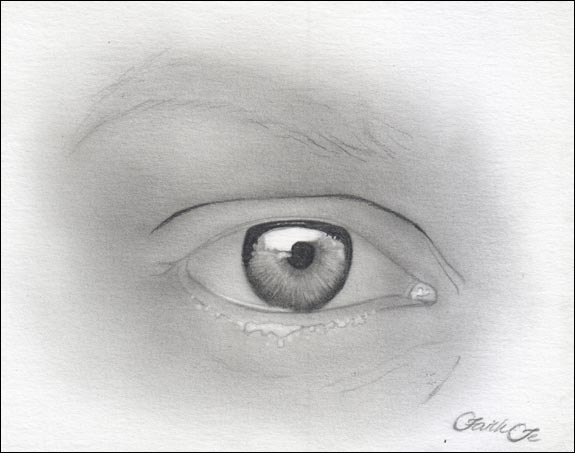
Step 9:
Here I began working on the skin. Using a 0.5 mm HB mechanical pencil and a light circular motion, I added tones to the upper eyelid and the surrounding skin — starting first on an area which will receive more graphite (in this case, the skin around the crease) and moving towards lighter areas. I used a shop towel and a brush to smoothen out rough spots.
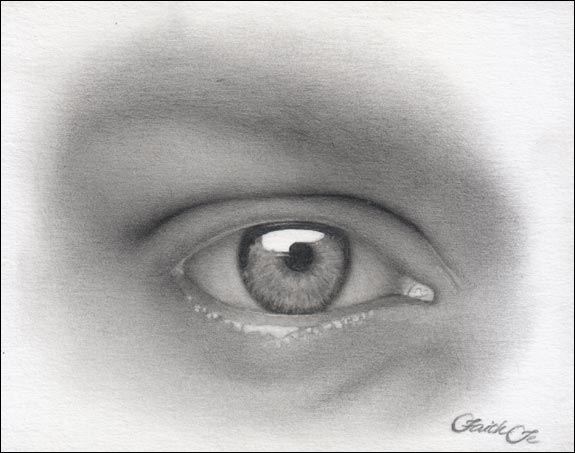
Step 10:
Continued with the lower part of the skin.
Step 11:
Still continuing with the HB mechanical pencil. I’ve now added shadows to the skin. The 5H Staedtler pencil was also used on the thickness of the lower eyelid. 2B mechanical pencil was used for its darker areas.
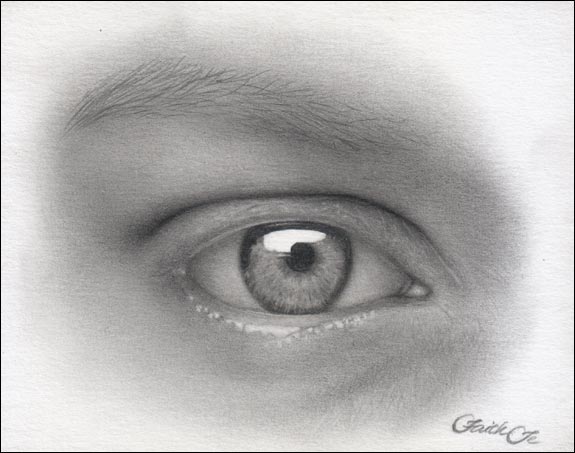
Step 12:
To create the wrinkles on the skin, I lightly drew lines with the HB mechanical pencil and then used a kneaded eraser to create fine highlights beside each line. A paper stump and a brush were used to soften and blend the lines. The same method used on the white of the eye was also used on the tear duct. The HB was used for the eyebrow — starting with the root of each hair and lessening pressure towards the tip.
Step 13:
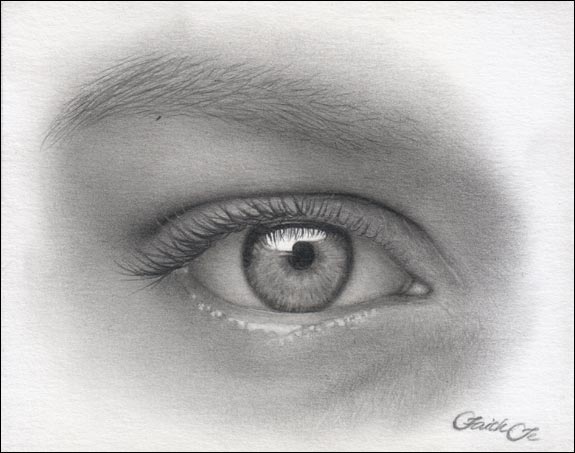
I always try to keep from drawing the eyelashes until the skin underneath is finished. Since the upper eyelashes will be darker than the lower eyelashes or the eyebrow, I used a Dong-A 2B mechanical pencil which is much darker than a Faber-Castell of the same grade. Again, following the direction of growth and starting from the root, lessening pressure as I come to the tip. Reflections of the eyelashes were also drawn on the highlight of the iris.
Step 14:
The lower eyelashes were drawn with the Faber-Castell 2B mechanical pencil.
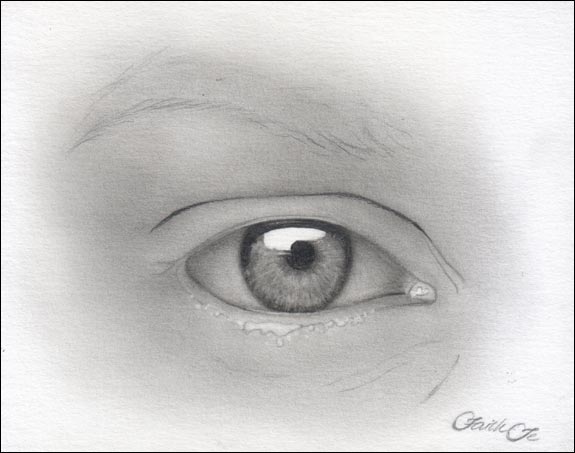
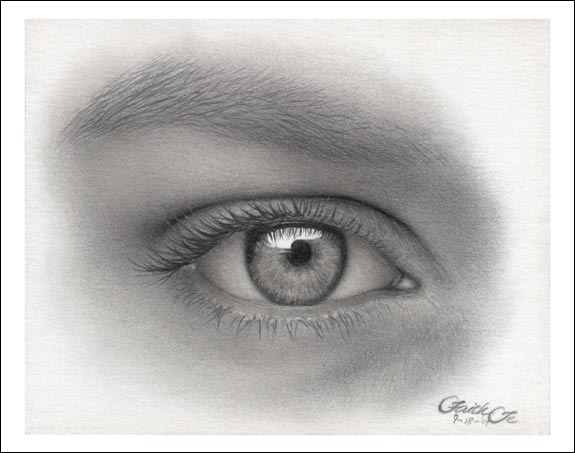
Step 15:
The final eye. Finishing touches were made and some of the highlights on the lower eyelid were dulled a little. I hope you find these steps and images informative and helpful.
About Faith
Graphite Pencil, Charcoal Pencil and Pastels Artist
Hello! My name is Faith Te. When I was 16, a great desire to capture nature and the people around me started my passion for drawing. I began to look at drawing not just as a hobby but something which I wanted to do all my life.
I practiced every day and for many hours since. I taught myself to draw by experimenting with different techniques and materials and through helpful tips and advice from other artists.
Initially, charcoal and graphite pencils were the only mediums I used. When I began working in color, I used pastels, and more recently, oils. My main subjects are portraits but I also enjoy doing many other subjects including still life, landscapes and flowers, especially orchids.
I devote many hours and lots of attention to detail into each and every one of my drawings or paintings. My ultimate goal is not only to achieve detail and realism but also to capture the life and character of my subjects.
Thank you for your interest in my artwork. I sincerely hope you enjoy your stay here on our web site. Please visit again soon!
Please take a moment to visit Faith’s Website and Blog to learn more about her and her products and services.
I will do my best to provide you with more demo’s like this one.
Thanks for your comments!
– Ralph
Giannasays
The best demo I’ve seen. Wonderful detail in the instructions and the art. Great step by step pictures and instructons not to mention how beautiful it turned out.
Wow Faith, You have demonstrated the method of pencil shading in a superbly systematic way. Your confidence and judgement of getting the desired tonal strength is really very good. Thanks to you and Ralph for sharing such a wonderful demo. Look forward ro having more..
maria stevenssays
Wonderful! What patience apart from talent. I hope to follow these steps but have a funny feeling they will not be as fantastically realistic as yours Faith. Thanks so much for sharing your info. Looking forward to checking out more of your work.
Chrissays
Faith, That was great. As I scrolled down and admired each image, in the last frame, I was jolted into reality when my face did not appear in the reflection! I hope to learn more from you. Chris
Bee Owenssays
thank you thank you thank you and thank you again you have been very helpful . i will be lookin for your next demo. i sure will use this .Thanks Bee
Thank you for all your kind and inspiring words and compliments, everyone! They are very greatly appreciated. I am happy to know that you like this tutorial. I will try my best to create more.
All the best and happy drawing! Faith
Jane Parkersays
This is one of the best demos I have ever seen! Love the use of graphite powder – I bought some a year ago and have not used it, but I will now! Thank you so much!!!!!!!!
You are super fantastic. I’ll be teaching a 7th grade art class starting in August and I’m so glad I found a site for the talented students to gain inspiration. I’ll look forward to more. Denise
Thank you for the kind words, Priyanka! .-= Faith Te´s last blog ..Lemons =-.
Hanan Abdullahsays
very nice thank you so much
Teresasays
Your drawings are amazing! Thank you for sharing with this tutorial.
I don’t know if I’ll ever be able to create the detail that you do, and boy is the knead eraser harder to work with than I originally thought. I don’t know the technique for all those thin lines.
Teresa — Thank you for your comment! As for the kneaded eraser, I first roll it into a log shape then use my index finger and thumb to pinch it to make a thin tip. Then I lightly drag that across my drawing to create the fine highlights. You’ll need to repeat the same procedure after one or two uses though so that you’ll have a clean new tip to work with. Also, I find that used kneaded erasers are much better for this purpose because new ones are still too tacky.
You may also experiment with stick erasers to create those fine highlights. Try the sharp edge of a new stick eraser or use a knife to create a chisel tip. Perhaps you’ll find that easier to use. Hope that helps! .-= Faith Te´s last blog ..Paradise in Blue Bottle =-.
Absolutely love it! This tutorial is amazing. I can’t believe my ‘eye’. Sorry! had to throw a pun in there. But seriously, it’s amazing. Can’t wait to put it to practice.
WOW! What a great tutorial! Thanks for putting it together.
Melissasays
Wow… This tutorial is awesome. I am very much a beginner, but I was still able to follow these instructions and come up with something I’m proud of. Thank you so, so much.
Bob Whitingsays
I’m very,very impressed the eye is so realistic I feel if I put a finger on it it would blink and shed a tear. As 68yr old pensioner with time between gardening I have just started on pencil drawing, as you can imagine my attempts at portriat drawings would show this. I am taking tips and tricks from other artists like yourself on how it should be done and hopefully achieve a better standard of drawing. I think I can say for all, thank you for sharing how it is done. It’s brilliant. Bob Whiting U.K
Bob Whiting
Krystasays
You are an extremely talented artist, and this is coming from someone who considers herself an artist as well. However, something didn’t look right to me..and I realized…the eyebrow is backwards. The hairs are going the wrong direction and the eyebrow is shaped backwards completely…I showed it to my fiance and he agrees that it is. I can understand that perhaps you did draw the hairs in the right direction but that it simply -looks- backwards but regardless it definitely seems off because of it. Other than that you are a very talented person and this is a beautiful drawing and good explanation of your technique. Regards, Krysta
samanthasays
beautiful
georgiasays
omg i tried this didnt turn out so well you are such a good drawer!
PVRaosays
Great work !! Good..
owensays
the eye is really well done. very detailed and realistic. great job.
mysketchsays
perfect mastery of objects and a very good technique, also the pencil strokes smooth and neat, impressive picture of the living
Anasays
believe me.. this is the best tutorial i’ve ever met i tried this too and it had awsome results thanks:D
Sweetbeariessays
Really cool tutorial, and thanks for sharing! .
Jeniasays
OMG! i’ve tried it, couldnt wait to try, but didnt have right pencils, so i did with just one hard pencil and it turned out well! i will try with the right ones soon, im sure i’ll do it as realistic as you! thank you so much for tutorial! eyes and hands are the most difficult to draw!
Sanjeev Handasays
“Really very nicely done. Intricate details of all the shades of the eye are taken care of quite well. I consider myself also an artist but am amased with the kind of detailing you have done.” Sanjeev Handa
Brendasays
Wow! Thank you. This is a great tutorial.
canvas paintingssays
Wow that is truly unbelievable. I’ve tried drawing eyes before but only on manga style but this is awesome. The shading and depth and life like skin tone are superb. A great tutorial many thanks for sharing.
Alexandra:-)says
wow! I can`t believe how Faith Te made it I have tried five times to draw that eye and I still don`t get it right and I am on the first step
Pamsays
Extraordinarily realistic eye! Great work.
Ole-Thomas Bechenstensays
Professional performance.This is a tutorial by a pro. I`m stunned! ( if your not professional, go for it! )
Jaime Antunezsays
Wow! I scrolled through the steps and when I got to the end I couldn’t help but have a smile on my face. Thank you for your work. I learned something today.
Stephsays
What a great tutorial! Its helped me a lot with my drawing with your clear diagrams and instructions. Hugs!
hifzasays
realy very nice !!!!!!!!realyyyy
Kevinsays
Great!!! I followed your tutorial and made a very nice eye!! (yours is better of course!) Thank you!!!
Bob Whitingsays
I leave, I return,then leave again, then return and see the mess I’ve produced in comparison to your artistic ablility and will never give in and will keep returning until I get things near right. [and left a comment] being in awe of your ablitiy and art media range.
I can only say ‘Have I got a steep hill to climb’ looking at your art it is astounding such beauty I need to practice more but don’t worry I doubt if I would reach your standard.
I have two questions which feel free to ignore, What type of brush do you use for shading with graphite powder.
Would I be better using graphite powder than the current graphite I am using from sanded down HB mechanical pencil lead/graphite for economy until getting used to shading.
Many thanks for the demo’s and showing of your art. Your art is a blessing to see.
Jessicasays
can you do a tutorial on hair!! your drawings a great.
staciesays
That is.. incredible. I must admit, for the first couple of pictures I thought it all looked a bit basic but as the drawing built up it just got so amazing. You must have a lot of patience to take the time to really build your art like that, great job. I hope you do more of these!
Adam Carsonsays
very very impressive. Thank you very much.
beesays
I recently came across your blog and have been reading along. I thought I would leave my first comment. I don’t know what to say except that I have enjoyed reading. Nice blog. I will keep visiting this blog very often.
vinaysays
awsome !!
christysays
this is beautiful, I definitely learned a lot reading over this & comparing to my art. I will definitely start using more than one pencil!
nasirsays
very very nice.how real it looks
Chee-wah Teesays
I just followed the steps,by just using 2B pencil,and the result was superb.Thank you,Faith.
snigdhasays
hey thankz a lot its just amazing god had given you the art
*BaNaNa*says
OMG you are so amazing! I am sooooooooooooooooo going to try this, the instructions are so straight forward, WOWOW!!!!!!!
lkfanaisays
wow…. thats all i can say…. i love you work…. wish i could be like you….
Amruthasays
you are really gifted…….. i can see the love for art in you. i would be glad if u give me more of what u know. i have just learned drawing and i too have interest in it……pl show how to sketch potraits
Richardsays
Hi Faith. I too, believe you are very talented and your eye drawing is so realistic. I’ve drawn most of my life, but mostly just sketches of old houses etc, but nothing I’ve done in past years is worthy of putting on display though. Recently I decided to take up drawing again and this time do some fine art drawings. I came across this page and your steps outlining how you drew the Eye are so easy to follow, you explained it so well. I decided to try and draw the eye following your steps, and I’ve completed it I think. My drawing looks real life like I think, but I’m bias lol and I know that a few things aren’t done as they should be in my drawing. When i scan it I would like to email it to you for your opinion? Thank you in advance 🙂 and I can’t wait to look at the rest of your drawings. Keep up the beautiful work. Take care, Richard.
Johnie Singleysays
I thought it was going to be some boring old post, but it really compensated for my time.Thank you so much
zubairsays
love it
Robertsays
Brilliant Faith Te I’m learning a lot since looking in on your’s and David’s tuitions.
Bernardsays
I Do like this sooo much …….you are too much and will like to see more Shading of u ..
Dr Senthil Kumar Ssays
Nice and useful information, I like it.
Charliesays
Wow! You amazed me so much with your article. It is truly an interesting piece. I am quiet interested in arts like the one you did above, and I am actually looking for simple online tutorials where I could learn drawing. I really appreciate that.
A very interesting tutorial, very clear explanation of the steps. In my blog I posted a post with the different phases of a pencil drawing, in this case of a historic building.
That eye looks so real.You such a great artist.Love you Faith.
rudysays
thank you Faith. Your drawing is very good…
Anonymoussays
This is really good tutorial. Thanks Faith!
neesays
its’really awesome……
aarthisays
i tried this using only one pencil , that too the normal apsara pencil . though not good as the above picture it came out very good for me. it looks great
Janicesays
Fantastic job Faith! I am amazed how you put every inch of your effort and skill in creating an emotion out from an eye drawing. I have tried doing this and following each step you posted, but, the outcome was not as good as yours. I hope that through time and continuous practice,I will get better with giving my best in every inch of detail.
Alexsays
This is great tutorial Faith ! Thanks for sharing.
Gracesays
Looks like a photograph! Amazing! x
Patricia Walkersays
Hi Faith, your work is beautiful. I’ve been doing portraits since 1988. I’ve worked my way off of Welfare teaching in my small apartment and drawing in a nearby Hotel. I even have a few autographed prints of some of the Football HOF Enshrinees. I stopped drawing for a few years due to sickness. I’m disabled now, but I’m back to drawing now. Your work inspired me to keep going. Thank you for sharing. I would like to share my technique but I don’t know quite how to go about it. Artistically Yours. PAW
DEEPAK Bsays
THANK U. IT IS USEFULL, WONDERFULL, BEAUTIFULL.
Rajesh R vsays
your art is cool I am also make sketches and try to make parfact and quality work attracts me a lot and give me inspiration. like you did.. keep it up , very nice , I’ll try to make like this.. than show you thanks for sharing
dansays
great drawing
Pedro Mazzillosays
Great drawing!!! Great technique!!! And great tips too! Thank you very very much! What is the size of this drawing? Mazzillo
cikalsays
nice. & love u…………. 🙂
hemantsays
you are great i like this and i will try to do same
Jacksays
Hi Faith, your art is great style. I’m Thai engineer working man, but I like art very much. Your art bring me back to my dream again, So I’ll try back to basic life. Thank you…
what a wonderful way of explaining the shades! was really very useful for me. looking forward to your step by step drawing methods for the other parts too.. looks the final image looks like a one taken using a camera.. wonderful job..would be great if u were ma tutor lolzz
jyotisays
absolutely loved this, very very methodical. i feel inspired to pick up a pencil !
jyotisays
absolutely loved this, very very methodical. i feel inspired to pick up a pencil ! however a greedy me demands a video of it so that i do not trouble u for nitty gritty details.
moneimsays
I couldn’t imagine that what you are doing is possible! Its pure art and a pure artist.
Tinasays
I’ve found this insanely helpful. I’ve been drawing for years but never knew how a layout like this was done. You’ve saved me much time and a lot of well known frustration. For traditional artists, this is super helpful. Thank you!
nahidsays
very nice . Thank you very much 🙂
raghusays
thanks lot what ican say I am very helpful thothi tutoriala very thanks
Joey Groenewaldsays
This is so FANTASTIC! I am going to practice this, they say practice makes perfect, so this is what I’ll do. Thank you for sharing your talent with others.
Miekesays
Just when I have almost given up this wonderful inspirational tutorial from Faith Te comes my way. I will certainly give it my best. Thank you for so generously sharing your talent and knowledge. I will try to spend more time practicing!
Carlasays
Gorgeous human eye, but unfortunately the eyebrow hairs are backwards. It’s a right eye under a left eyebrow.
ashoksays
Great Technique…Awesome and Continue this creative work!!
Sheelasays
Really cool tutorial. Video lessons will be more helpful too. You have a great artistic talent and the eyes look realistic too. Keep up your good work.


Faith’s demo simply awesome, is it possible to have more?
regards
Les
Very nice, Faith!
Mara Mattia’s last blog post..Lesson #25 Painting and Scraping Wateer
Hi Les,
I will do my best to provide you with more demo’s like this one.
Thanks for your comments!
– Ralph
The best demo I’ve seen. Wonderful detail in the instructions and the art. Great step by step pictures and instructons not to mention how beautiful it turned out.
You are very gifted.
Wow Faith, You have demonstrated the method of pencil shading in a superbly systematic way. Your confidence and judgement of getting the desired tonal strength is really very good. Thanks to you and Ralph for sharing such a wonderful demo. Look forward ro having more..
Wonderful! What patience apart from talent. I hope to follow these steps but have a funny feeling they will not be as fantastically realistic as yours Faith. Thanks so much for sharing your info. Looking forward to checking out more of your work.
Faith, That was great. As I scrolled down and admired each image, in the last frame, I was jolted into reality when my face did not appear in the reflection! I hope to learn more from you. Chris
thank you thank you thank you and thank you again you have been very helpful . i will be lookin for your next demo. i sure will use this .Thanks Bee
Thank you for all your kind and inspiring words and compliments, everyone! They are very greatly appreciated. I am happy to know that you like this tutorial. I will try my best to create more.
All the best and happy drawing!
Faith
This is one of the best demos I have ever seen! Love the use of graphite powder – I bought some a year ago and have not used it, but I will now!
Thank you so much!!!!!!!!
Faith
That is not only great ,it is amazing,you are a real artist,hope to see more of your work
Jane and Sana, thank you for your comments. I do hope you find the demo helpful!
Thank you for an excellent demo. I love the way you have absorbed the original line drawing into the finished work. Brilliant!
Hi Peter! Thank you so much for your comment. Glad you like it!
GREAT!
Very inspiring demonstration.
Thank you. From a beginner looking for all inspiration possible on refining drawing and sketching.
Thanks so much for your comments, Karen and Ann!
Brilliant drawing of the eye Faith,you are extremely talented.
Thanks so much for your kind words, Glenn!
Using the 5H to draw the lines in the iris is a great idea, thanks for the tip!
Miranda’s last blog post..Tips to Improve your Drawing: How to See
You are super fantastic. I’ll be teaching a 7th grade art class starting in August and I’m so glad I found a site for the talented students to gain inspiration. I’ll look forward to more.
Denise
Thanks for your comments, Denise!
.-= Faith Te´s last blog ..Red Onion =-.
you are suparb i believe you have imense blessings of god in form of art.
Thank you for the kind words, Priyanka!
.-= Faith Te´s last blog ..Lemons =-.
very nice
thank you so much
Your drawings are amazing! Thank you for sharing with this tutorial.
I don’t know if I’ll ever be able to create the detail that you do, and boy is the knead eraser harder to work with than I originally thought. I don’t know the technique for all those thin lines.
Hanan — Glad you like the demonstration!
Teresa — Thank you for your comment! As for the kneaded eraser, I first roll it into a log shape then use my index finger and thumb to pinch it to make a thin tip. Then I lightly drag that across my drawing to create the fine highlights. You’ll need to repeat the same procedure after one or two uses though so that you’ll have a clean new tip to work with. Also, I find that used kneaded erasers are much better for this purpose because new ones are still too tacky.
You may also experiment with stick erasers to create those fine highlights. Try the sharp edge of a new stick eraser or use a knife to create a chisel tip. Perhaps you’ll find that easier to use. Hope that helps!
.-= Faith Te´s last blog ..Paradise in Blue Bottle =-.
Truly astonishing work. Beautiful. Well done.
.-= Matt Bryan´s last blog ..MIMA =-.
Absolutely love it! This tutorial is amazing. I can’t believe my ‘eye’. Sorry! had to throw a pun in there. But seriously, it’s amazing. Can’t wait to put it to practice.
WOW! What a great tutorial! Thanks for putting it together.
Wow… This tutorial is awesome. I am very much a beginner, but I was still able to follow these instructions and come up with something I’m proud of. Thank you so, so much.
I’m very,very impressed the eye is so realistic I feel if I put a finger on it it would blink and shed a tear.
As 68yr old pensioner with time between gardening I have just started on pencil drawing, as you can imagine my attempts at portriat drawings would show this. I am taking tips and tricks from other artists like yourself on how it should be done and hopefully achieve a better standard of drawing. I think I can say for all, thank you for sharing how it is done. It’s brilliant.
Bob Whiting U.K
Bob Whiting
You are an extremely talented artist, and this is coming from someone who considers herself an artist as well. However, something didn’t look right to me..and I realized…the eyebrow is backwards. The hairs are going the wrong direction and the eyebrow is shaped backwards completely…I showed it to my fiance and he agrees that it is. I can understand that perhaps you did draw the hairs in the right direction but that it simply -looks- backwards but regardless it definitely seems off because of it. Other than that you are a very talented person and this is a beautiful drawing and good explanation of your technique.
Regards,
Krysta
beautiful
omg i tried this
didnt turn out so well
you are such a good drawer!
Great work !! Good..
the eye is really well done. very detailed and realistic. great job.
perfect mastery of objects and a very good technique, also the pencil strokes smooth and neat, impressive picture of the living
believe me.. this is the best tutorial i’ve ever met
i tried this too and it had awsome results
thanks:D
Really cool tutorial, and thanks for sharing!
.
OMG! i’ve tried it, couldnt wait to try, but didnt have right pencils, so i did with just one hard pencil and it turned out well! i will try with the right ones soon, im sure i’ll do it as realistic as you! thank you so much for tutorial! eyes and hands are the most difficult to draw!
“Really very nicely done. Intricate details of all the shades of the eye are taken care of quite well. I consider myself also an artist but am amased with the kind of detailing you have done.” Sanjeev Handa
Wow! Thank you. This is a great tutorial.
Wow that is truly unbelievable. I’ve tried drawing eyes before but only on manga style but this is awesome. The shading and depth and life like skin tone are superb. A great tutorial many thanks for sharing.
wow! I can`t believe how Faith Te made it I have tried five times to draw that eye and I still don`t get it right and I am on the first step
Extraordinarily realistic eye! Great work.
Professional performance.This is a tutorial by a pro. I`m stunned! ( if your not professional, go for it! )
Wow! I scrolled through the steps and when I got to the end I couldn’t help but have a smile on my face. Thank you for your work. I learned something today.
What a great tutorial! Its helped me a lot with my drawing with your clear diagrams and instructions. Hugs!
realy very nice !!!!!!!!realyyyy
Great!!! I followed your tutorial and made a very nice eye!! (yours is better of course!) Thank you!!!
I leave, I return,then leave again, then return and see the mess I’ve produced in comparison to your artistic ablility and will never give in and will keep returning until I get things near right. [and left a comment] being in awe of your ablitiy and art media range.
I can only say ‘Have I got a steep hill to climb’ looking at your art it is astounding such beauty I need to practice more but don’t worry I doubt if I would reach your standard.
I have two questions which feel free to ignore, What type of brush do you use for shading with graphite powder.
Would I be better using graphite powder than the current graphite I am using from sanded down HB mechanical pencil lead/graphite for economy until getting used to shading.
Many thanks for the demo’s and showing of your art.
Your art is a blessing to see.
can you do a tutorial on hair!! your drawings a great.
That is.. incredible. I must admit, for the first couple of pictures I thought it all looked a bit basic but as the drawing built up it just got so amazing. You must have a lot of patience to take the time to really build your art like that, great job. I hope you do more of these!
very very impressive. Thank you very much.
I recently came across your blog and have been reading along. I thought I would leave my first comment. I don’t know what to say except that I have enjoyed reading. Nice blog. I will keep visiting this blog very often.
awsome !!
this is beautiful, I definitely learned a lot reading over this & comparing to my art. I will definitely start using more than one pencil!
very very nice.how real it looks
I just followed the steps,by just using 2B pencil,and the result was superb.Thank you,Faith.
hey thankz a lot its just amazing god had given you the art
OMG you are so amazing! I am sooooooooooooooooo going to try this, the instructions are so straight forward, WOWOW!!!!!!!
wow…. thats all i can say….
i love you work….
wish i could be like you….
you are really gifted…….. i can see the love for art in you. i would be glad if u give me more of what u know. i have just learned drawing and i too have interest in it……pl show how to sketch potraits
Hi Faith. I too, believe you are very talented and your eye drawing is so realistic. I’ve drawn most of my life, but mostly just sketches of old houses etc, but nothing I’ve done in past years is worthy of putting on display though. Recently I decided to take up drawing again and this time do some fine art drawings. I came across this page and your steps outlining how you drew the Eye are so easy to follow, you explained it so well. I decided to try and draw the eye following your steps, and I’ve completed it I think. My drawing looks real life like I think, but I’m bias lol and I know that a few things aren’t done as they should be in my drawing. When i scan it I would like to email it to you for your opinion? Thank you in advance 🙂 and I can’t wait to look at the rest of your drawings. Keep up the beautiful work. Take care, Richard.
I thought it was going to be some boring old post, but it really compensated for my time.Thank you so much
love it
Brilliant Faith Te I’m learning a lot since looking in on your’s and David’s tuitions.
I Do like this sooo much …….you are too much and will like to see more Shading of u ..
Nice and useful information, I like it.
Wow! You amazed me so much with your article. It is truly an interesting piece. I am quiet interested in arts like the one you did above, and I am actually looking for simple online tutorials where I could learn drawing. I really appreciate that.
wow! your artical is very nice.
A very interesting tutorial, very clear explanation of the steps. In my blog I posted a post with the different phases of a pencil drawing, in this case of a historic building.
http://jmtoldra.blogspot.com/2011/01/amfiteatre-de-nimes.html
That eye looks so real.You such a great artist.Love you Faith.
thank you Faith. Your drawing is very good…
This is really good tutorial. Thanks Faith!
its’really awesome……
i tried this using only one pencil , that too the normal apsara pencil . though not good as the above picture it came out very good for me. it looks great
Fantastic job Faith! I am amazed how you put every inch of your effort and skill in creating an emotion out from an eye drawing. I have tried doing this and following each step you posted, but, the outcome was not as good as yours. I hope that through time and continuous practice,I will get better with giving my best in every inch of detail.
This is great tutorial Faith ! Thanks for sharing.
Looks like a photograph! Amazing! x
Hi Faith, your work is beautiful. I’ve been doing portraits since 1988. I’ve worked my way off of Welfare teaching in my small apartment and drawing in a nearby Hotel. I even have a few autographed prints of some of the Football HOF Enshrinees. I stopped drawing for a few years due to sickness. I’m disabled now, but I’m back to drawing now. Your work inspired me to keep going. Thank you for sharing. I would like to share my technique but I don’t know quite how to go about it.
Artistically Yours. PAW
THANK U. IT IS USEFULL, WONDERFULL, BEAUTIFULL.
your art is cool
I am also make sketches and try to make parfact
and quality work attracts me a lot and give me inspiration.
like you did..
keep it up , very nice ,
I’ll try to make like this..
than show you
thanks for sharing
great drawing
Great drawing!!!
Great technique!!!
And great tips too!
Thank you very very much!
What is the size of this drawing?
Mazzillo
nice. & love u…………. 🙂
you are great i like this and i will try to do same
Hi Faith, your art is great style. I’m Thai engineer working man, but I like art very much. Your art bring me back to my dream again, So I’ll try back to basic life. Thank you…
what a wonderful way of explaining the shades! was really very useful for me. looking forward to your step by step drawing methods for the other parts too.. looks the final image looks like a one taken using a camera.. wonderful job..would be great if u were ma tutor lolzz
absolutely loved this, very very methodical. i feel inspired to pick up a pencil !
absolutely loved this, very very methodical. i feel inspired to pick up a pencil ! however a greedy me demands a video of it so that i do not trouble u for nitty gritty details.
I couldn’t imagine that what you are doing is possible! Its pure art and a pure artist.
I’ve found this insanely helpful. I’ve been drawing for years but never knew how a layout like this was done. You’ve saved me much time and a lot of well known frustration. For traditional artists, this is super helpful. Thank you!
very nice . Thank you very much 🙂
thanks lot what ican say I am very helpful thothi tutoriala very thanks
This is so FANTASTIC! I am going to practice this, they say practice makes perfect, so this is what I’ll do. Thank you for sharing your talent with others.
Just when I have almost given up this wonderful inspirational tutorial from Faith Te comes my way. I will certainly give it my best. Thank you for so generously sharing your talent and knowledge. I will try to spend more time practicing!
Gorgeous human eye, but unfortunately the eyebrow hairs are backwards. It’s a right eye under a left eyebrow.
Great Technique…Awesome and Continue this creative work!!
Really cool tutorial. Video lessons will be more helpful too. You have a great artistic talent and the eyes look realistic too. Keep up your good work.
You’re a great instructor! Very clear. Thank you!